Creating Hold Bins
What is a Hold Bin?
OpenBoxes includes a feature that enables users to create hold bins within a location. This feature is very helpful when products need to be isolated or prevented from being picked or shipped.
Inventory placed in Hold Bins will not be available to picked for shipments. An example for when to place inventory in Hold Bins is if you received information from supplier that a product lot number is being investigated if the lot number should be recalled. Another instance is if you want to put aside some product quantity to provide to a specific ward.
This page is focused on creating hold bins in OpenBoxes for your warehouse or depot. For additional information on using hold bins for inventory management, including how to put products on hold, please see placing inventory on hold.
Configure Hold Bin
First, we need to set up a location type. This can be done in Configuration and select Location Types.

Location Types Option under Configuration You will be directed to a page that lists the current location types. Click on the ‘Add Location Type’ button to get started with the workflow.

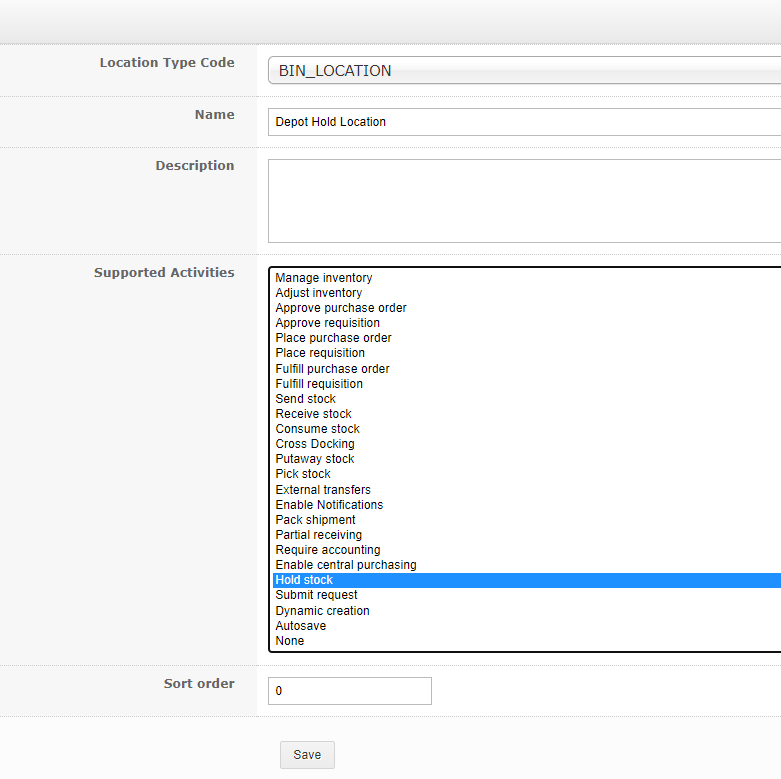
Add Location Type Button - In the Created Location Type page, you need to enter some important information before the location is created.
- Location Type Code: Select BIN_LOCATION.
- Name: In the example, I have called it Depot Hold Bin. You can name it what makes sense to your Depot.
- Description (Optional): Add description.
- Supported Activities: Select 'Hold Stock'.
- Hit Save.


You will now have created a Hold Bin for your Depot! Now, you can create Hold Bin Locations at your site.
Create Hold Bin Location for your Site
Now, you need to create the bin location at your site.
- Go to Configurations, and select Location to go to the Location List Page.
In the Locations List page, select the location where you will be creating the Hold Bin.
In this example, I’ve selected the Thomonde Depot. You can click on the Location name or click on the Dropdown menu next to the name and select 'Edit Location' to proceed.

Once on the Edit Location page, select the ‘Bin Location’ tab and then click ‘Add Bin Location.'

- The Add Internal Location screen will appear where you can add information.
- Location type: Select the Hold Bin that you just created.
Name: Enter a name for the Bin Location.

- Click Save.


The hold bin has now been created at this site. We will see confirmation in the upper left that the location has been updated, and ‘Hold Bin 1’ with location type ‘Depot Hold Bin’ is now visible on the bin location list.

This bin location can now be used to place product on hold and prevent it from being picked and used in shipments. See this article on how to do that: Placing Inventory on Hold.